- Posts: 147
- Thank you received: 12

Espar Heater
- Augydoggy
-
 Topic Author
- Offline
- Premium Member
-

Less
More
14 years 9 months ago #1239
by Augydoggy
Espar Heater was created by Augydoggy
We live aboard our boat and because we both still work we stay on the Chesapeake year-round. Last winter we installed an Espar D5 diesel heater. We got it up and running just in the nick of time as the water temperature had dropped to 38 degrees that day. 38 degrees is the cutoff for reverse cycle systems and ours froze up solid, providing us with inspiration to complete the installation. Once we got it up and running (midnight that night) we had few problems and all of them had to do with changing the set-up codes. For the rest of the season the heater ran flawlessly.
Now we're into our second season with the heater. We have the parts needed to service it but I'm letting it go to see how long she'll run. Last year it ran 24/7 from mid-December until mid-March, something like 2100 hours, non-stop. We didn't get any data on fuel consumption then so I'm paying closer attention to it this year. We have a milder Winter this year so we didn't start it up until January 5th but it's been running 24/7 since then. We started with a full tank, hand carried 80 gallons with 5 jerry cans. After sixteen days we topped off the tank again and found that we used 35 gallons of fuel. I was a little alarmed at this until I did the math. 15 days x 24 = 360 hours. We're using 1/10 gallon per hour, exactly what the books says. We paid $3.50/gal so we're paying about $250/month for heat. That's not too bad considering that we're inside a fiberglass shell sitting in nearly freezing water. We like to keep it comfortable, 71 degrees during the day and turn it down to 68 at night.
Forced hot air is a good way to heat your boat. It keeps it dry inside, for the most part. Places that don't get warmed up tend to sweat, inside some cabinets for instance. We insulate the inside of our hatches to prevent heat loss and when you pull away the insulation you tend to take a bath from the condensation. The system is quiet and reliable. Our exhaust is noisy but that might be because of the configuration and a little time spent on it might bring it down to a better level. We've used the heater while out sailing (full cockpit enclosure) and on the hook. It has little drain on the batteries and extends the sailing season to year-round. Well worth the investment.
Tom + Cheri
IP420-35
La Vida Dulce
Now we're into our second season with the heater. We have the parts needed to service it but I'm letting it go to see how long she'll run. Last year it ran 24/7 from mid-December until mid-March, something like 2100 hours, non-stop. We didn't get any data on fuel consumption then so I'm paying closer attention to it this year. We have a milder Winter this year so we didn't start it up until January 5th but it's been running 24/7 since then. We started with a full tank, hand carried 80 gallons with 5 jerry cans. After sixteen days we topped off the tank again and found that we used 35 gallons of fuel. I was a little alarmed at this until I did the math. 15 days x 24 = 360 hours. We're using 1/10 gallon per hour, exactly what the books says. We paid $3.50/gal so we're paying about $250/month for heat. That's not too bad considering that we're inside a fiberglass shell sitting in nearly freezing water. We like to keep it comfortable, 71 degrees during the day and turn it down to 68 at night.
Forced hot air is a good way to heat your boat. It keeps it dry inside, for the most part. Places that don't get warmed up tend to sweat, inside some cabinets for instance. We insulate the inside of our hatches to prevent heat loss and when you pull away the insulation you tend to take a bath from the condensation. The system is quiet and reliable. Our exhaust is noisy but that might be because of the configuration and a little time spent on it might bring it down to a better level. We've used the heater while out sailing (full cockpit enclosure) and on the hook. It has little drain on the batteries and extends the sailing season to year-round. Well worth the investment.
Tom + Cheri
IP420-35
La Vida Dulce
Please Log in or Create an account to join the conversation.
- wb8qcy
-

- Offline
- New Member
-

Less
More
- Posts: 1
- Thank you received: 0
13 years 10 months ago #1796
by wb8qcy
Replied by wb8qcy on topic Re: Espar Heater
Hello Tom and Cheri, read your note about the diesel heater. Considering I also have a 420-55, am considering this type of heater for my boat. WOnder where you installed it and any other information you might provide. Does the humidity that's generated create any problems in the cabin?
Also interested in your canvas. Note that you have a full enclosure. I need to replace mine and am considering the full enclosure. Pictures or info on your canvas would be appreciated.
Thanks
Bob
Free Spirit
Also interested in your canvas. Note that you have a full enclosure. I need to replace mine and am considering the full enclosure. Pictures or info on your canvas would be appreciated.
Thanks
Bob
Free Spirit
Please Log in or Create an account to join the conversation.
- Augydoggy
-
Topic Author
- Offline
- Premium Member
-
Less
More
- Posts: 147
- Thank you received: 12
13 years 10 months ago #1797
by Augydoggy
Replied by Augydoggy on topic Re: Espar Heater
Bob,
We installed the D5 in the port side cockpit locker. We originally had it mounted "port + starboard" on the bulkhead shared with the aft cabin. This was only to make the installation easier because we were seriously pressed for time. We've since relocated it to a shelf mounted "forward + aft" on the inside of the hull in that same locker.
The duct travels the length of the boat on the port side against the hull. From the cockpit locker it goes into the aft cabin below the shelf at the head of the bunk, through the cabinets and into the aft head. It stays beneath the cabinet in the head and continues into the salon, entering the small aft cabinet behind the settee and then dropping down into the storage area behind the settee. The main outlet is branched off here into the aft storage area below the settee seat and this one remains open at all times. The duct continues forward through two hanging lockers (salon and forward cabin) at floor level and then into the forward head inside the cabinet with the sink, exiting forward and blasting air from below the shelf. We have closeable vents in the forward head, at floor level in the forward cabin at the base of the hanging locker and also in the aft cabin at the base of the cabinet just aft of the hanging locker. The aft head gets enough heat just from what radiates off the ductwork.
We ran a return line beginning in the aft bulkhead of the aft cabin just above the doorway to the genset compartment. The duct for this extends along the upper port side of this compartment, runs out the back and gently curves into the port cockpit locker, connecting back to the D5 heater.
Exhaust for the heater is port side stern just below the toerail. We're looking for a plug or cap for this when we're out on the ocean. It's unplugged location is fine for here on the Chesapeake. Fuel line runs from the tank, below the sole into the engine room on the starboard side, into the genset space and into the port cockpit locker along the forward bulkhead. The fuel line supplied with the kit wasn't long enough so we bought a 50' roll to have one continuous line. We have the control mounted at the nav station and the wire for that was about 5' short and had to be extended.
Humidity isn't a problem and the overall feel down below is very comfortable, not damp, not dry. Condensation does form against the inside of the hull back inside cabinets and storage areas and here we've gotten some mold. We also had condensation forming on the inside of the hatches but have found that running our small 12v circulation fans mounted in the living spaces keeps the air moving enough to prevent condensation build-up on the hatches. We've thought about placing small computer type pancake fans into enclosed areas to prevent sweating but haven't gotten that far yet.
There's a write-up of the install on our blog (ip42035-9.blogspot.com/?zx=c8778d89e963029) with some pictures. It hasn't been updated yet to show the new position of the heater. This is not a difficult installation and the most important thing is to not have any tight turns in the duct, meaning restrictions. We originally had a 90 in the return line and it caused unusual fault codes two weeks after we first got it running. This is the main reason we re-positioned the heater.
We ended up enclosing the ductwork in the aft cabin and aft head using simple teak boxes with recessed screens for vents (ipyoa.com/photos/603-cheri--tom-ward/album?albumid=239). The ducts do get hot and we wrapped ours with insulation. We added a duct muffler where it first comes into the aft cabin and are now contemplating adding another in the return line. With that it should be absolutely silent. We're also considering running a closeable vent into the cockpit.
Our full cockpit enclosure was done by attaching Eisenglass panels with snaps and zippers to the inside of our screens. Total cost was about $700 but we already had the sewing machine. It's not as nice as having separate panels because you're looking through both the Eisenglass and screens but it works fine for us. I don't think we had the skills to build new frames and match up with the snaps installed for the screens. Guess that's why the pro's get paid the big bucks!
Sorry for the lengthy reply. I tend to get carried away sometimes.
Tom Ward
IP420-35
"La Vida Dulce"
We installed the D5 in the port side cockpit locker. We originally had it mounted "port + starboard" on the bulkhead shared with the aft cabin. This was only to make the installation easier because we were seriously pressed for time. We've since relocated it to a shelf mounted "forward + aft" on the inside of the hull in that same locker.
The duct travels the length of the boat on the port side against the hull. From the cockpit locker it goes into the aft cabin below the shelf at the head of the bunk, through the cabinets and into the aft head. It stays beneath the cabinet in the head and continues into the salon, entering the small aft cabinet behind the settee and then dropping down into the storage area behind the settee. The main outlet is branched off here into the aft storage area below the settee seat and this one remains open at all times. The duct continues forward through two hanging lockers (salon and forward cabin) at floor level and then into the forward head inside the cabinet with the sink, exiting forward and blasting air from below the shelf. We have closeable vents in the forward head, at floor level in the forward cabin at the base of the hanging locker and also in the aft cabin at the base of the cabinet just aft of the hanging locker. The aft head gets enough heat just from what radiates off the ductwork.
We ran a return line beginning in the aft bulkhead of the aft cabin just above the doorway to the genset compartment. The duct for this extends along the upper port side of this compartment, runs out the back and gently curves into the port cockpit locker, connecting back to the D5 heater.
Exhaust for the heater is port side stern just below the toerail. We're looking for a plug or cap for this when we're out on the ocean. It's unplugged location is fine for here on the Chesapeake. Fuel line runs from the tank, below the sole into the engine room on the starboard side, into the genset space and into the port cockpit locker along the forward bulkhead. The fuel line supplied with the kit wasn't long enough so we bought a 50' roll to have one continuous line. We have the control mounted at the nav station and the wire for that was about 5' short and had to be extended.
Humidity isn't a problem and the overall feel down below is very comfortable, not damp, not dry. Condensation does form against the inside of the hull back inside cabinets and storage areas and here we've gotten some mold. We also had condensation forming on the inside of the hatches but have found that running our small 12v circulation fans mounted in the living spaces keeps the air moving enough to prevent condensation build-up on the hatches. We've thought about placing small computer type pancake fans into enclosed areas to prevent sweating but haven't gotten that far yet.
There's a write-up of the install on our blog (ip42035-9.blogspot.com/?zx=c8778d89e963029) with some pictures. It hasn't been updated yet to show the new position of the heater. This is not a difficult installation and the most important thing is to not have any tight turns in the duct, meaning restrictions. We originally had a 90 in the return line and it caused unusual fault codes two weeks after we first got it running. This is the main reason we re-positioned the heater.
We ended up enclosing the ductwork in the aft cabin and aft head using simple teak boxes with recessed screens for vents (ipyoa.com/photos/603-cheri--tom-ward/album?albumid=239). The ducts do get hot and we wrapped ours with insulation. We added a duct muffler where it first comes into the aft cabin and are now contemplating adding another in the return line. With that it should be absolutely silent. We're also considering running a closeable vent into the cockpit.
Our full cockpit enclosure was done by attaching Eisenglass panels with snaps and zippers to the inside of our screens. Total cost was about $700 but we already had the sewing machine. It's not as nice as having separate panels because you're looking through both the Eisenglass and screens but it works fine for us. I don't think we had the skills to build new frames and match up with the snaps installed for the screens. Guess that's why the pro's get paid the big bucks!
Sorry for the lengthy reply. I tend to get carried away sometimes.
Tom Ward
IP420-35
"La Vida Dulce"
Please Log in or Create an account to join the conversation.
- Barney1964
-

- Offline
- Junior Member
-

Less
More
- Posts: 30
- Thank you received: 2
12 years 5 months ago #2880
by Barney1964
Replied by Barney1964 on topic IP 40 - Heating
Hello everyone
We are about to move aboard, throw in the professional careers and live the life we seem to read and hear about!!. Whilst based at 26 south (Brisbane, Australia), we intend to spend our share of time in temperate zones.
So, we are looking to source a diesel heater, that not only warms the cabin, but heats the hot water system.
In Australia, the range is limited (it really doesn't get that cold here!), and we have been contemplating a Webasto, more particularly a Thermo TopC / Thermo 50.
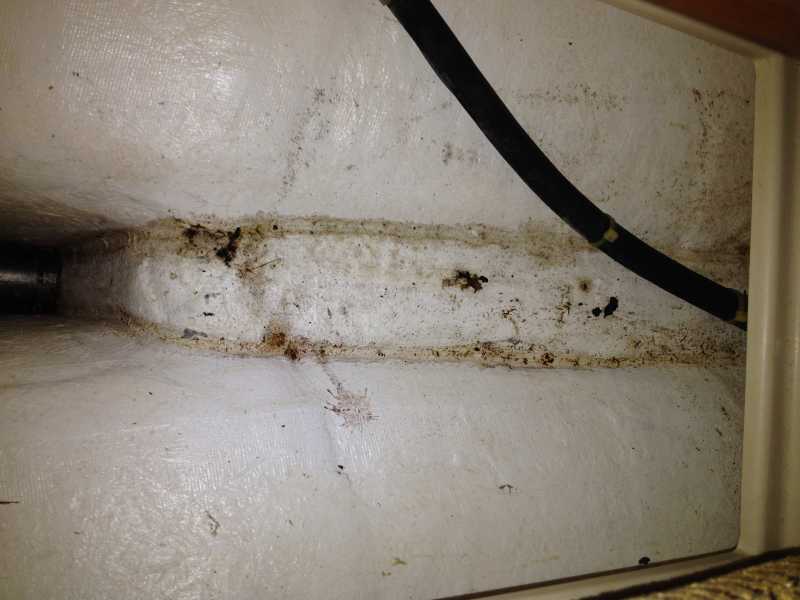
I have been contemplating installing it above and just aft of the stern tube (access under the aft cabin bunk, with a lid already in place). The catch so far is that the webasto is side mounted - and the only place with sufficient depth is at the forward end of the frame ... which restricts access to the stern gland. Restricting access to that area is something that makes me nervous.
As the lazarette / after hatch is full, then it's got to go somewhere that's not intrusive.
Webasto have also encouraged us to seriously consider the 'plate heat exchanger' instead of the hot water cylinder - and that prevents us running the hot water off shore power, not keen about that.
A pic of the proposed location is attached.
Webasto have suggested the Thermo Top C Thermo 50 would not be big enough to comfortably manage the water heater of that capacity, and are trying to upsell us to the Thermo 90 ST.
Anyway - your feedback would be most welcome, particularly from those who have gone down this path.
Best regards and sincere thanks
Lester & Helen
We are about to move aboard, throw in the professional careers and live the life we seem to read and hear about!!. Whilst based at 26 south (Brisbane, Australia), we intend to spend our share of time in temperate zones.
So, we are looking to source a diesel heater, that not only warms the cabin, but heats the hot water system.
In Australia, the range is limited (it really doesn't get that cold here!), and we have been contemplating a Webasto, more particularly a Thermo TopC / Thermo 50.
I have been contemplating installing it above and just aft of the stern tube (access under the aft cabin bunk, with a lid already in place). The catch so far is that the webasto is side mounted - and the only place with sufficient depth is at the forward end of the frame ... which restricts access to the stern gland. Restricting access to that area is something that makes me nervous.
As the lazarette / after hatch is full, then it's got to go somewhere that's not intrusive.
Webasto have also encouraged us to seriously consider the 'plate heat exchanger' instead of the hot water cylinder - and that prevents us running the hot water off shore power, not keen about that.
A pic of the proposed location is attached.
Webasto have suggested the Thermo Top C Thermo 50 would not be big enough to comfortably manage the water heater of that capacity, and are trying to upsell us to the Thermo 90 ST.
Anyway - your feedback would be most welcome, particularly from those who have gone down this path.
Best regards and sincere thanks
Lester & Helen
Please Log in or Create an account to join the conversation.
- Barney1964
-
- Offline
- Junior Member
-
Less
More
- Posts: 30
- Thank you received: 2
12 years 5 months ago #2907
by Barney1964
Replied by Barney1964 on topic Re: IP 40 - Heating
As a follow up:-
The Webasto Thermo Top 50 puts out 2.6 kW (8871 btu) at partial load and 5.2 kW (17,742 btu) at full load.
Have read about a couple of LRC 40's in higher latitude parts of North America, one with a ITR Hurricane H2 that put out 35,000 btu (and consumed over a gallon of diesel per hour - wow!!) and the other had an Espar D8LC heater with ducting to the three 'living and sleeping spaces' - that seemed to produce between 12K & 27K btu.
Therefore, are the Australian agents correct - to go the Thermo 90 ST.
If no one really knows on the forum - is there a good contact at the factory?
Thanks in anticipation of your assistance
Lester
The Webasto Thermo Top 50 puts out 2.6 kW (8871 btu) at partial load and 5.2 kW (17,742 btu) at full load.
Have read about a couple of LRC 40's in higher latitude parts of North America, one with a ITR Hurricane H2 that put out 35,000 btu (and consumed over a gallon of diesel per hour - wow!!) and the other had an Espar D8LC heater with ducting to the three 'living and sleeping spaces' - that seemed to produce between 12K & 27K btu.
Therefore, are the Australian agents correct - to go the Thermo 90 ST.
If no one really knows on the forum - is there a good contact at the factory?
Thanks in anticipation of your assistance
Lester
Please Log in or Create an account to join the conversation.
- Augydoggy
-
Topic Author
- Offline
- Premium Member
-
Less
More
- Posts: 147
- Thank you received: 12
12 years 5 months ago #2908
by Augydoggy
Replied by Augydoggy on topic Re: IP 40 - Heating
Lester - I have no experience with the hot water system and can't help you out there. My experience with the hot air system from Espar leads me to encourage you to really give some thought to the location of the main unit. You felt that placing it in the cockpit locker wouldn't work because that's already full. My heater is now mounted high on a shelf epoxied to the hull. It's out of the way but has easy access for maintenance. And yes, our locker is also packed with stuff. On our boat the space around the stern tube doesn't afford much space unless it blocks access to the packing nut. The adjustment of that nut is such a bear I wouldn't want anything else in the way.
I'll be interested to hear more about your project. Please keep us posted on your decisions and progress.
Tom
I'll be interested to hear more about your project. Please keep us posted on your decisions and progress.
Tom
Please Log in or Create an account to join the conversation.
- Barney1964
-
- Offline
- Junior Member
-
Less
More
- Posts: 30
- Thank you received: 2
11 years 5 months ago #4021
by Barney1964
Replied by Barney1964 on topic Re: IP 40 - Heating
Thanks all....
Still looking at it, and wintering in Tasmania - 43 degrees south (not living on board though!) has brought some enhanced focus to this task.
We have decided the water heating aspect is "too hard", so are back at the Webasto Air Top 2000ST - output 0.9 - 2.0 kW.
Any comments re:-
(a) location of the actual unit and
(b) position of the ducting runs and
(c) where the outlets are located,
.... particularly for an IP40 would be greatly appreciated.
Thanks again
Lester & Helen
Still looking at it, and wintering in Tasmania - 43 degrees south (not living on board though!) has brought some enhanced focus to this task.
We have decided the water heating aspect is "too hard", so are back at the Webasto Air Top 2000ST - output 0.9 - 2.0 kW.
Any comments re:-
(a) location of the actual unit and
(b) position of the ducting runs and
(c) where the outlets are located,
.... particularly for an IP40 would be greatly appreciated.
Thanks again
Lester & Helen
Please Log in or Create an account to join the conversation.
Time to create page: 0.119 seconds
We have 763 guests and no members online
Disclaimer
Island Packet and Island Packet Yachts are registered trademarks of IPY (Island Packet Yachts, Inc.). IPYOA and The Island Packet Yacht Owners Association, have no affiliation with IPY, the Island Packet Yacht Company. Throughout our IPYOA Facebook Group and on this IPYOA.com website the terms Island Packet and Island Packet Yachts are used for identification purposes only. This use is FAIR USE and NOMINATIVE. We are NOT a yacht manufacturer we are a yacht owners group.
Sincerely,
The International IPYOA administration team.