- Posts: 55
- Thank you received: 3

Re-Refrgeration IP-31
- raceboat61-S
-
 Topic Author
- Offline
- Senior Member
-

Less
More
15 years 5 months ago #621
by raceboat61-S
Re-Refrgeration IP-31 was created by raceboat61-S
Gents,
The previous owner removed the old Adler-Barbour refrigeration unit from "Nomad" (IP-31 #49)before we bought her. Now, I'd like to replace the system. Previous system had worn out and owner didn't like the location of the compressor on the aft port side locker abeam the engine. I'd like to hear from other IP-31 owners (or others) about a suggested replacement. I have not YET added any insulation. Our plan is to sail mostly in coastal waters but MAY spend a week or more offshore or in the Bahamas. Please suggest: replacement model/manufacturer, size unit, location for installation, insulation options, where to buy, etc. Thanks, Mike Raceboat61-S
The previous owner removed the old Adler-Barbour refrigeration unit from "Nomad" (IP-31 #49)before we bought her. Now, I'd like to replace the system. Previous system had worn out and owner didn't like the location of the compressor on the aft port side locker abeam the engine. I'd like to hear from other IP-31 owners (or others) about a suggested replacement. I have not YET added any insulation. Our plan is to sail mostly in coastal waters but MAY spend a week or more offshore or in the Bahamas. Please suggest: replacement model/manufacturer, size unit, location for installation, insulation options, where to buy, etc. Thanks, Mike Raceboat61-S
Please Log in or Create an account to join the conversation.
- hayden
-

- Offline
- Moderator
-

15 years 5 months ago #622
by hayden
Hayden Cochran
IP35-165 Island Spirit
IslandSpirit35.blogspot.com
Rock Hall, MD
Replied by hayden on topic Re: Re-Refrgeration IP-31
Mike:
I have the AB Super Cold Machine and it has run now since 1994! These are unreal. We turn ours on in April, leave it on until the end of OCT! When this unit dies, I will go back in with the exact same unit. I like the air cooled unit (others will disagree in seconds) but with this there are no water pumps and discharge hoses to worry about when left on 24/7 adn we are not onboard. That's why I like it.
AB has been bought by DOMETIC and you can read all about these units here:
www.dometic.com/enus/Americas/USA/Marine...?productdataid=87280
This topic like anchors will stir up many various opinions and you will have to listen to all then make you decision and select one. Our boata came with this, and now after using it for 10 seasons, we love it. We did add simple insulation and will add more this season.
As for location. We placed/moved out up high in the sail locker against the forward wall closes to the ice box. See pic...
Hayden
Hayden Cochran
IP35-165 Island Spirit
IslandSpirit35.blogspot.com
Rock Hall, MD
Please Log in or Create an account to join the conversation.
- badsanta
-

- Offline
- New Member
-

Less
More
- Posts: 7
- Thank you received: 0
15 years 5 months ago #629
by badsanta
Replied by badsanta on topic Re: Re-Refrgeration IP-31
Mine was removed also. I have not decided what to do yet. I am very intrested in this also. Alan Roach IP31 #160
Please Log in or Create an account to join the conversation.
- raceboat61-S
-
Topic Author
- Offline
- Senior Member
-
Less
More
- Posts: 55
- Thank you received: 3
15 years 4 months ago #639
by raceboat61-S
Replied by raceboat61-S on topic Re: Re-Refrgeration IP-31
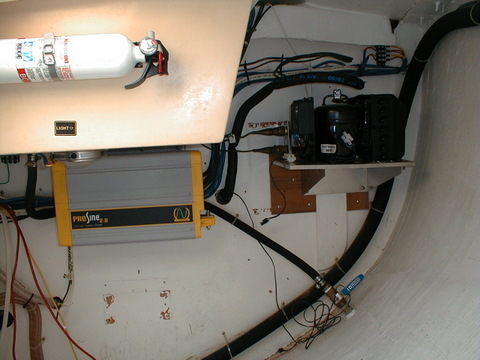
Well, gents, I have contacted 2 'installers' here on the Gulf Coast. Both of them can purchase compatible units cheaper than the retail offers from West Marine. They can get either the Mermaid unit direct from the factory in Ft. Meyers or the Adler-Barbour unit from distributers here in Florida. Installation costs are about $65/hour and should take about 4-6 hours for removal and re-installation.
I think that I'll go with the Mermaid unit for 2 basic reasons: They have the same compressor (Danfoss) which is the core of the unit but the total unit cost is less. Also, the Mermaid has an automatic shift between 110volt A/C and 12V D/C depending on available power source. Oh, and the Mermaid MM-2 unit comes with a 5-year warrantee and has the cooling capacity to support a 9cubic foot referigerator box and still have a freezer compartment.
On a side note, I am going to replace the 16,500btu reverse-cycle air conditioner at the same time. It will also be a Mermaid unit which uses seawater or air depending on cooling needs. Why? Because the current unit and all ancillary pumps, ducting, wiring and thermostat are already there. Thanks, I'll take pictures and keep you posted on the installation progress. Mike
The following user(s) said Thank You: badsanta
Please Log in or Create an account to join the conversation.
- a Guest
-

- Visitor
-

15 years 4 months ago - 15 years 4 months ago #641
by a Guest
Replied by a Guest on topic Re: Re-Refrgeration IP-31
Suggest that before you do anything that you consider adding extra insulation to the existing box which is to big anyway. We now have a full freezer compartment (6 months of frozen meat) and spill over to the reefer side. All this with one Frigaboat K-50 Keel cooled unit. The K-50 uses the Danfoss Compressor, Keel cooled condenser - no water pump, no hot air in the lazarette, etc. Power consumption on our system is 2.2 amps while running using the adaptive controller.
I used to recommend Vacuum insulation but it is was to costly so no would use polyisocyanurate panels - more R per inch than any other panel products.
Bobby
Martinique
I used to recommend Vacuum insulation but it is was to costly so no would use polyisocyanurate panels - more R per inch than any other panel products.
Bobby
Martinique
Last edit: 15 years 4 months ago by a Guest. Reason: left out info
Please Log in or Create an account to join the conversation.
- badsanta
-
- Offline
- New Member
-
Less
More
- Posts: 7
- Thank you received: 0
15 years 4 months ago #645
by badsanta
Replied by badsanta on topic Re: Re-Refrgeration IP-31
keep us posted, Thanks
Please Log in or Create an account to join the conversation.
- ceherro
-
- Offline
- New Member
-
Less
More
- Posts: 10
- Thank you received: 0
11 years 9 months ago #3431
by ceherro
Replied by ceherro on topic Re: Re-Refrgeration IP-31
I am going to turn my ice box into a refrigerator. I don't want to have holes drilled in my hull. Please give me advice on appropriate systems. I have two batteries. Will I need more? If so, what lockers are good choices.
Chuck Herro
IP 35-101
Lynda Gail, San Francisco
Chuck Herro
IP 35-101
Lynda Gail, San Francisco
Please Log in or Create an account to join the conversation.
- hayden
-
- Offline
- Moderator
-
11 years 9 months ago #3432
by hayden
Hayden Cochran
IP35-165 Island Spirit
IslandSpirit35.blogspot.com
Rock Hall, MD
Replied by hayden on topic Re: Re-Refrgeration IP-31
Chuck
I have used the Adler/Barbour cold machine for 20 years. It it breaks I will put the same one back in. Install in sail locker. No water pump. No thru hull. Works great. Works when on the hard!
www.dometic.com/enus/Americas/USA/Marine...?productdataid=87280
You can buy this from defender.
Hayden.
I have used the Adler/Barbour cold machine for 20 years. It it breaks I will put the same one back in. Install in sail locker. No water pump. No thru hull. Works great. Works when on the hard!
www.dometic.com/enus/Americas/USA/Marine...?productdataid=87280
You can buy this from defender.
Hayden.
Hayden Cochran
IP35-165 Island Spirit
IslandSpirit35.blogspot.com
Rock Hall, MD
Please Log in or Create an account to join the conversation.
- cat30
-

- Offline
- Senior Member
-
Less
More
- Posts: 65
- Thank you received: 2
11 years 7 months ago #3622
by cat30
Replied by cat30 on topic Re: Re-Refrgeration IP-31
does anyone have an idea how much insulation there is in the IP31 icebox- i added 2" of foamboard inside (I'm covering the foamboard with fiberglass panel or formica) and now i wonder if this was necessary. i'm installing the adler barbour with the VD-152 evaporator unit and CU-100 cold machine compressor.
Please Log in or Create an account to join the conversation.
- hayden
-
- Offline
- Moderator
-
11 years 7 months ago - 11 years 7 months ago #3623
by hayden
Hayden Cochran
IP35-165 Island Spirit
IslandSpirit35.blogspot.com
Rock Hall, MD
Replied by hayden on topic Re: Re-Refrgeration IP-31
One of the weakest aspects of the Island Packet, the older models, would be the insulation behind the ice box. It is sprayed in and it is well known that there are voids. So, it is best to do what you are doing, that being adding foam board insulation to the inside. We kept it simple and used 2" on the sides and 4" on the bottom. Then we covered this with, the simple to use, RFLECTIX air conditioning foil faced bubble wrap. The seams were taped together with aluminum tape. This has works for many years. We think easy is better than vacuum panels, fiblerglass custom lids, special lid gaskets and all this. Just keep it simple, insulate it with boards, and cover it with reflectix, and you are done.
Here is a detailed photo album:
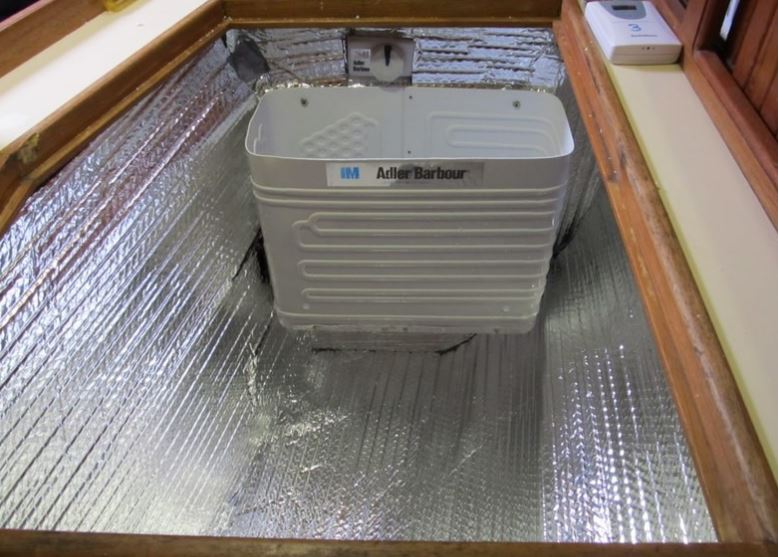
ipyoa.com/photos/62-hayden/album?albumid=92
Hayden
Here is a detailed photo album:
ipyoa.com/photos/62-hayden/album?albumid=92
Hayden
Hayden Cochran
IP35-165 Island Spirit
IslandSpirit35.blogspot.com
Rock Hall, MD
Last edit: 11 years 7 months ago by hayden.
Please Log in or Create an account to join the conversation.
- Emergpa1
-

- Offline
- Elite Member
-

Less
More
- Posts: 176
- Thank you received: 8
11 years 7 months ago - 11 years 7 months ago #3629
by Emergpa1
My opinion, for what it's worth and that's not much, is that adding extra insulation this day and age is sort of complicating the project more than someone who is just starting to install a cooler really needs to worry about. I did not add any installation and have not had any problem with cooling issues with my Adler Beiber air cooled unit installed close to two years ago now. I have not had any problems keeping my cheapie battery bank in charge while being at anchor offshore with minimal running of the engine. And I have not yet upgraded my batteries to the appropriate final battery bank. (I am focusing on getting my charging system optimized first.)
I think today's charging systems and battery banks with a solar panel is more than adequate to maintain that you need. And I like to keep things simple as possible. I think allowing the original poster to focus on getting his refrigerating unit installed without worrying about adding insulation at this time is worth considering. Then add if needed later.
Replied by Emergpa1 on topic Re: Re-Refrgeration IP-31
That's a good idea of putting the insulation inside, as we never even fill up our smaller IP 31 icebox. However, we do have a bit of problem with drainage and wondering how well your unit drains and how the moisture would collect underneath and in the small cracks that you would inevitably have with the reflective insulation there. Periodically we have to clear the drain with a small piece of seizing wire.hayden wrote: One of the weakest aspects of the Island Packet, the older models, would be the insulation behind the ice box. It is sprayed in and it is well known that there are voids. So, it is best to do what you are doing, that being adding foam board insulation to the inside. We kept it simple and used 2" on the sides and 4" on the bottom. Then we covered this with, the simple to use, RFLECTIX air conditioning foil faced bubble wrap. The seams were taped together with aluminum tape. This has works for many years. We think easy is better than vacuum panels, fiblerglass custom lids, special lid gaskets and all this. Just keep it simple, insulate it with boards, and cover it with reflectix, and you are done.
Here is a detailed photo album:
ipyoa.com/photos/62-hayden/album?albumid=92
Hayden
My opinion, for what it's worth and that's not much, is that adding extra insulation this day and age is sort of complicating the project more than someone who is just starting to install a cooler really needs to worry about. I did not add any installation and have not had any problem with cooling issues with my Adler Beiber air cooled unit installed close to two years ago now. I have not had any problems keeping my cheapie battery bank in charge while being at anchor offshore with minimal running of the engine. And I have not yet upgraded my batteries to the appropriate final battery bank. (I am focusing on getting my charging system optimized first.)
I think today's charging systems and battery banks with a solar panel is more than adequate to maintain that you need. And I like to keep things simple as possible. I think allowing the original poster to focus on getting his refrigerating unit installed without worrying about adding insulation at this time is worth considering. Then add if needed later.
Last edit: 11 years 7 months ago by Emergpa1. Reason: Wording
Please Log in or Create an account to join the conversation.
- cat30
-
- Offline
- Senior Member
-
Less
More
- Posts: 65
- Thank you received: 2
11 years 7 months ago #3635
by cat30
Replied by cat30 on topic Re: Re-Refrgeration IP-31
Keith- what wall of the ice box did you mount the evaporator? and any more info about your installation- i'm trying to figure out how to install the tubing without too many bends- or running into any of the blown-in foam already surrounding the icebox. I'm thinking of the starboard wall or the back wall for mounting.
i've already installed 2-inches of foam all around but i plan to put something over it and seal all the edges.
i've already installed 2-inches of foam all around but i plan to put something over it and seal all the edges.
Please Log in or Create an account to join the conversation.
- Emergpa1
-
- Offline
- Elite Member
-
Less
More
- Posts: 176
- Thank you received: 8
11 years 7 months ago #3636
by Emergpa1
The cooler will draw about 50 amp hours a day. You should be able to produce that a good solar panel system and good solar charge controller. A good system should generate about 45 hours a day with sun. The rest will just be LED interior lights and fans. This could be made up with your alternator. If you are sailing and using instruments and wheel pilot you will also be running your engine occasionally. That may very well make up for the difference.
I should give the disclaimer that I have not got a Bahamas tour but have spent several nights on the hood and so far my charging system, which is premium, has been up to the task.
Your drainage tube for your cooler will grow mold and stuff. They sure you have a way of clearing this with some seasoning wire once a month.
Replied by Emergpa1 on topic Re: Re-Refrgeration IP-31
Installing the refrigeration unit is very straightforward. First of all the refrigeration unit, as you can see, goes the built in base on the port side of the boat just to the rear of the galley bulkhead. Hopefully you can see that the tubing goes through the bulkhead into the cooler at the rear slightly to Starbord side of the cooler. The freezer box is mounted on the starboard side of the cooler. That is better than the back because it would be more difficult to get to back there. The installation is really very straightforward as all you are doing is wiring in the unit and drilling a hole through the cooler. Then you feel that whole with the spray insulation you can get at Home Depot.cat30 wrote: Keith- what wall of the ice box did you mount the evaporator? and any more info about your installation- i'm trying to figure out how to install the tubing without too many bends- or running into any of the blown-in foam already surrounding the icebox. I'm thinking of the starboard wall or the back wall for mounting.
i've already installed 2-inches of foam all around but i plan to put something over it and seal all the edges.
The cooler will draw about 50 amp hours a day. You should be able to produce that a good solar panel system and good solar charge controller. A good system should generate about 45 hours a day with sun. The rest will just be LED interior lights and fans. This could be made up with your alternator. If you are sailing and using instruments and wheel pilot you will also be running your engine occasionally. That may very well make up for the difference.
I should give the disclaimer that I have not got a Bahamas tour but have spent several nights on the hood and so far my charging system, which is premium, has been up to the task.
Your drainage tube for your cooler will grow mold and stuff. They sure you have a way of clearing this with some seasoning wire once a month.
Please Log in or Create an account to join the conversation.
- Emergpa1
-
- Offline
- Elite Member
-
Less
More
- Posts: 176
- Thank you received: 8
11 years 7 months ago #3637
by Emergpa1
Replied by Emergpa1 on topic Re: Re-Refrgeration IP-31
Pardon the voice to text errors please
Please Log in or Create an account to join the conversation.
- cat30
-
- Offline
- Senior Member
-
Less
More
- Posts: 65
- Thank you received: 2
11 years 6 months ago #3639
by cat30
Replied by cat30 on topic Re: Re-Refrgeration IP-31
Keith- good ideas, do you have to have a picture of the inside of the fridge?
Thanks
Don
Thanks
Don
Please Log in or Create an account to join the conversation.
- Emergpa1
-
- Offline
- Elite Member
-
Less
More
- Posts: 176
- Thank you received: 8
11 years 6 months ago #3651
by Emergpa1
Replied by Emergpa1 on topic Re: Re-Refrgeration IP-31
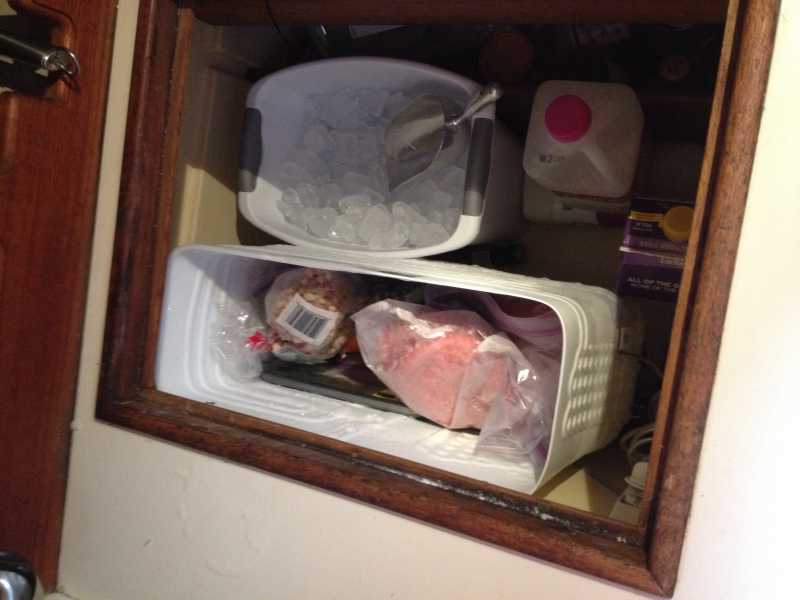
Sorry for the delay here hopefully attached is the photo.cat30 wrote: Keith- good ideas, do you have to have a picture of the inside of the fridge?
Thanks
Don
Please Log in or Create an account to join the conversation.
- Allen
-
- Offline
- New Member
-
Less
More
- Posts: 4
- Thank you received: 0
11 years 2 weeks ago #4010
by Allen
Replied by Allen on topic Re: Re-Refrigeration Insulation
I believe I have read most of what has been posted on improving the refrigerator insulation and I really like Hayden's solution. It is simple and I can do it myself. My concern is mold growing under the added insulation. I do not live aboard so I turn the refrigerator off when I am not on the boat and of course the freezer melting results in water melting. Has this not been a problem with others? How has it handled?
Thanks
Allen
Trafalgar IP29
Thanks
Allen
Trafalgar IP29
Please Log in or Create an account to join the conversation.
Time to create page: 0.403 seconds
We have 1735 guests and one member online
Disclaimer
Island Packet and Island Packet Yachts are registered trademarks of IPY (Island Packet Yachts, Inc.). IPYOA and The Island Packet Yacht Owners Association, have no affiliation with IPY, the Island Packet Yacht Company. Throughout our IPYOA Facebook Group and on this IPYOA.com website the terms Island Packet and Island Packet Yachts are used for identification purposes only. This use is FAIR USE and NOMINATIVE. We are NOT a yacht manufacturer we are a yacht owners group.
Sincerely,
The International IPYOA administration team.